Twirly Chocolate Fridge Cake

Image

Given the chance Boo would bake something most days.  She likes to crack the eggs, weigh the flour… but she loves to mix.  She’ll mix stones in a bucket, raisins in a pot, ice cream in a bowl.  She pretends to hold a big bowl in the air and mixes up food for imaginary horses or pups.  Sometimes I try to make our creations at least a little healthy (carrot or corguette cupcakes, beetroot cake) but this week she wanted “Chocolate Mummy!”  And however hard I try to shun the pink, this girl does still like the ballet and the jewels and the twirly dancing, so we made pretty, twirly chocolate cake.

Twirly chocolate fridge cake, to be precise.  A really child friendly recipe with no oven, but lots of mixing, naughty ingredients to be taste tested, and art to top it off. I usually make this with lots of glacé cherries (yum,) but my husband is not a fan so we added mini marshmallows from the store cupboard and they add that rocky road chew to balance the biscuit crunch.  There must be loads of recipes like this, but here is mine.  I really recommend trying it, the posh twirly topping is so satisfying to look at (especially as it was artfully created by a 3 year old)!
image

Ingredients:
4oz (110g) butter
2tbsp (25g) caster sugar
2 tbsp (30ml) golden syrup
4 tsp cocoa powder
8oz (225g) digestive biscuits
3 1/2oz (100g) raisins
Cup or large handful of mini marshmallows
4oz (110g)dark cooking chocolate
4oz (110g)milk cooking chocolate
3 1/2oz (100g) white cooking chocolate

First melt the butter, sugar, syrup and cocoa either in a saucepan or (carefully, checking every 30 seconds) in a microwave. I used the microwave and we counted together.

Put the biscuits in a bag with no holes and bash them into little pieces. A few larger pieces add texture, but don’t leave lots of big lumps.

Mix the biscuits, raisins and marshmallows into the butter mix until it starts to stick together.

Line a 1 inch high baking tray, or a flan dish with baking paper. Add the mix to the tray and push it down hard with the back of a spoon.

Now melt the dark and milk chocolate together. I know lots of people do this on the stove, but I find the microwave much easier. Just keep checking on it so it doesn’t burn. Tip the melted chocolate over the cake and spread to cover it.

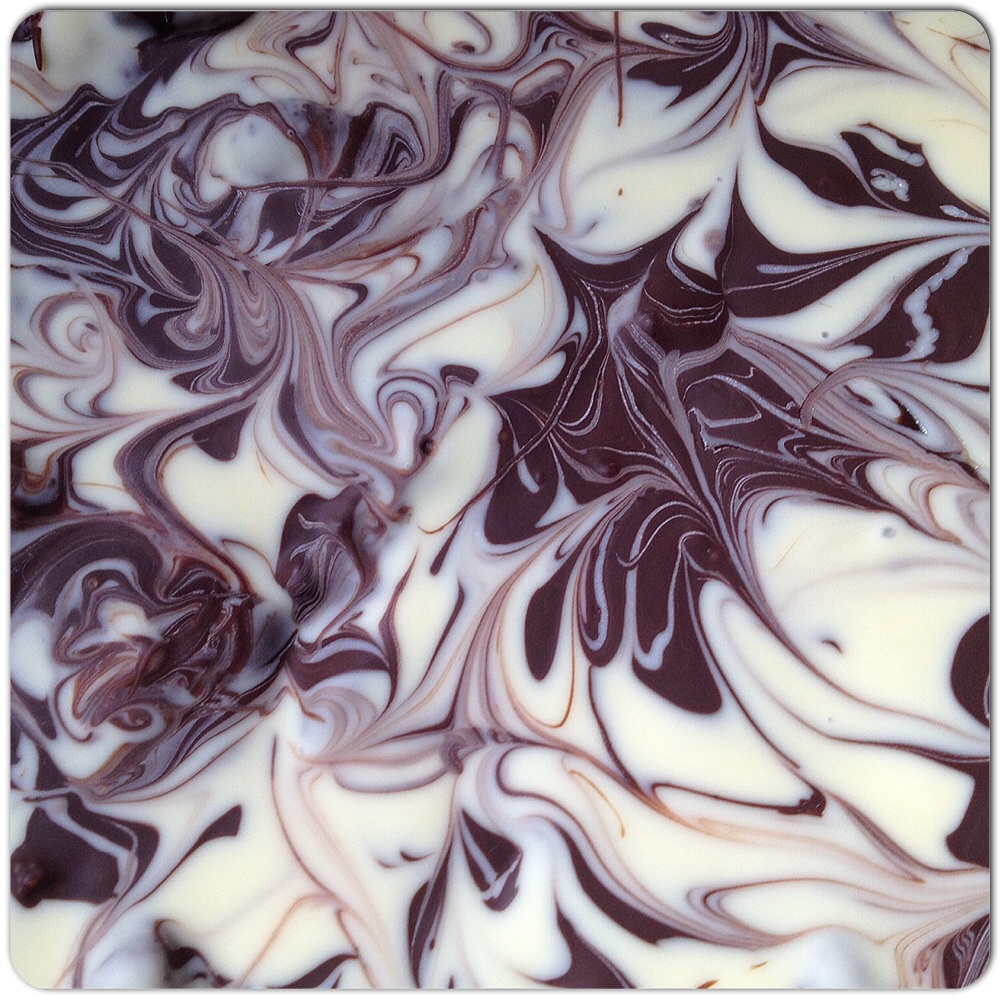
Melt the white chocolate and drizzle over the cake. Take a toothpick (or something similar, end of a chopstick, knitting needle!) and start to twirl in and out of the white chocolate, creating your arty pattern.

Place in the fridge to harden (or if you can’t wait that long, make space in the freezer for an hour).

Take out and take it out of tray easily using baking paper to lift it.

Marvel at the twirly beauty, then chop it with a sharp knife… and try not to eat the whole thing in one sitting!
image

Strawberry Creams

Image

I thought I would share these oh so simple strawberry creams as they are perfect to make when you have a really sweet tooth AND are so easy to make with toddlers too.  We made these on the spur of the moment today following a mammoth play dough session, most of which my daughter spent making heart shaped biscuits to bake in her toy oven.  When I asked if she would like like to make some real strawberry sweets, I think I got the fastest EVER response from both children – “Yes!” (No time to add please!). 

The great thing with these is that little ones can join in with the whole recipe, though I sadly didn’t get any pictures of mine making these as I only decided to post this when I searched on Pinterest and didn’t find a pin on these already (crazy I know). 

So, to make these you will need:

25g melted butter

225g icing sugar (confectioners)

1 teaspoon milk

1 teaspoon strawberry essence (I use silver spoon)

A little red food colouring

Image

This is so simple you can simply sift the icing sugar (I don’t even bother to sift!) into a bowl with all the other ingredients. Add colouring a little at a time and mix until you get a ball that you can then knead to spread  the colouring evenly and to smooth it out. The children love to see the colour emerge and the smell of the strawberry.  If it won’t ball up, add a little extra milk, if it is too sticky add extra sugar.

Now all you (or your little helpers) need to do is roll out onto a board dusted with icing sugar (so it doesn’t stick), grab your cutter (mine used play dough cutters- which we thoroughly cleaned first) and place your hearts onto a bit of grease proof paper or tin foil on a board in the fridge for 20 mins to cool and harden.  You can see these aren’t perfect versions… they really ARE child made, but if you take a little time yourself they can look very pretty.

Image

Finally, remove from fridge, pass to your child, and watch them devour in one go.  Beware, these are sugartastic fun fun fun but, hey, you are only a child once (and I like to relive my favourite childhood memories myself once the little ones are in bed)!

If you have followed carefully you’ll have noticed these are spookily similar to peppermint creams! You can be as creative as you like, change the flavour (vanilla, coffee, orange…) change your shapes (ghosts, snowflakes, dinosaurs). Let your children have fun with them.  We made some of these last valentines for Big Boo to take to pre school.  I’d love to see some of your own creations if you make some – let me know If you do.


Lazy Lavender Cupcakes

image

Lazy days, lazy sunshine, lazy fun and lazy cooking – what a great way to spend your summer!   With their subtle aroma of lavender, these cupcakes manage to relax you with their delicate flavour, and are so simple to bake that you could make up a batch right now to enjoy with your afternoon tea.

I’ve been noticing lots of lovely crafts and recipes popping up using lavender recently, and decided to make good use of some of the beautiful plants growing in my neighbour’s front garden at the moment.  The bees are in nectar heaven, but Big and Little Boo are not so keen on their visiting (there are ALOT of them, and Big Boo did get stung by one on holiday) so helping mummy to collect lavender was a brave task which was rewarded by helping to make these cakes, as they are so simple they are child’s play!

imageAll of the recipes I found were either biscuits (I can cook a good cupcake, but my biscuits never seem so great) or called for lavender to be infused overnight with milk. I’m sure this does develop a much stronger lavender flavour, but I am rather lazy and impatient too, so if I want to make lavender cupcakes, I want to make them NOW. With this in mind we simply made up our favourite basic cupcake recipe, and added about 2tbsp of lavender flowers.  Guess what? They worked a treat, beautiful, light and subtly flavoured and scented- enough to be noticed but not overpowering.

If you fancy a go, here is the recipe we used:

100g sugar (I used half and half but caster sugar is fine, or granulated if you don’t have caster)

100g self raising flour

100g butter

2 eggs

Good vanilla essence, just half the lid.

2 tbs lavender flowers, removed from stalk Some of mine were still fresh and some had dried but both seemed to work)

imageWe mixed the sugar, flour and 1tbsp lavender in the mixer first to pound the lavender a bit and distribute it. Then we added the softened butter and eggs (which Little Boo loves to crack) and finally mixed in the rest of the lavender, saving some of the fresher flowers to scatter on top of the cakes once the mixture had been spooned into it’s cases.

imageThey were cooked at 180 degrees for 19 minutes (that’s my oven for you), left to cool then promptly devoured – the only part of the process that wasn’t lazy!

I do warn you though- eating these cakes may bring out the superhero in you!

image

Hooray! My children eat courgette!

image

I’m off on a tangent today for this blog.  My usual content is either sewing or craft based, and I do have a couple of sewing projects ready to share except for the photos (including the salme playsuit!), but I’m waiting on some good weather combined with good timing to take some photos.  Whilst I tap my fingers I thought I’d share a meal with you, such a nice thing to do, share a meal with friends, don’t you think?

This meal has been a favourite with the family for a while now, and is something that everyone likes and is guaranteed to eat (don’t you just love it when that happens). My children will eat vegetables (Little Boo loves them) and do try new things, but Big Boo prefers his flavours unmixed (rice separate, pasta plain etc) and Little Boo loves finger food (i.e anything you can easily pick up – sausages, roast potatoes…). But this meal has them eating with a fork and wolfing down, great when you have visitors! Plus you can pep it up for the adults. I’m not sure where it came from, I think it stemmed from a meal I had at my brother’s in Sweden and developed from there. I know, I know, it isn’t anything amazing, theres no fancy ingredients or clever presentation, but it works, for my family at least, and maybe it will for yours too.

It really is simple, all you need is:

Pasta (dry or fresh, but I used dry as it is better for diets) – preferably one that the courgette can get into, like conchigle

2 courgettes (zucchini)

Parmesan – about 80g is fine for 4

Spring onions – about 3

Basil to decorate

Chilli flakes – to spice it up for the adults

image

It really is so simple, anyone can make this (even my husband!). Just cook the pasta according to instructions (mine takes 11 minutes on the hob). While it is cooking, spray you frying pan, or wok( sorry, I cook everything in my wok- I love it!) with cooking oil – you can use butter if you don’t mind calories. Finely chop the courgettes and spring onions in a blender and add to pan, stir over a medium heat for about 4 or 5 mins until they start to soften, but don’t get too mushy. Turn off heat and leave in pan.  Once cooked add the pasta to the courgettes and stir, then add the parmesan (saving some for little fingers to sprinkle on top at the table) and stir again.  Put in bowls, then add chilli flakes and basil to grown up food.  You can drizzle with balsamic vinegar rather than adding chilli if you don’t like the heat.

image

Present with some yummy garlic bread and parmesan to sprinkle.  Watch children shovel into mouths.

image

A happy mealtime makes a happy Mummy! Hope it works for you too.  If you have a fail safe kiddie favourite that works for grown ups too, I’d love to hear about it to add to my repertoire.  Happy eating….

Dinosaur Mars Bar Nests

image

Big Boo asked me the other day if we could leave a carrot out for the Easter Bunny. He also asked if he would get to meet him like he did Father Christmas and what presents does he bring? I hope his expectations aren’t too high! Anyway, with all the talk of eggs, we decided to make some edible dinosaur nests complete with eggs for his dinosaur to protect. I had a look on the Internet for some ideas for recipes then came up with my own that worked really well, making nests that don’t crumble and have just the right amount of chew to them too. It’s no great shakes but if you fancy trying making your own, just click here or on the photo above for the recipe.